Microsoft Dynamics Mobile App Integration with NAV 2016
Microsoft Dynamics Mobile App [Universal Phone Client App]
Microsoft comes up with Phone Client (also called as Microsoft Dynamics Universal App). You can download Phone Client / Mobile App on Android, Windows & iPhone Platform phones. Microsoft Dynamics NAV Phone client is targeted at users in small and medium-sized businesses that want to access data from a tablet or a phone.
Microsoft Dynamics Mobile App Requirement:
Supported Operating System on Mobile Phone?
- Android 4.4.3 or Later
- ios 8.4 or later
- windows 10 mobile
Requirements on Server:
- Microsoft Dynamics NAV 2016
- Web Client
- Powershell
- A server should on Public IP (i.e. accessible through anywhere outside domain)
- Security Certificate Thumbprint
- NAV License File should contain Limited User
Step 1:
Enable execution policy to run PowerShell to generate a certificate.
Go to à start à Open “Windows PowerShell” with run as Administrator
Enter “Set-ExecutionPolicy RemoteSigned” and press enter
Enter “Y” and press enter and Closed Page Window
 |
| Select Windows Power shell |
Step 2:
Download PowerShell Scripts
Click here to download Script
https://gallery.technet.microsoft.com/scriptcenter/Self-signed-certificate-5920a7c6#content

Step3:
Run PowerShell ISE to create Certificate
Go to à Start à Open “Windows PowerShell ISE” with Run an Administrator.
Go to the directory where you saved the New-SelfSignedCertificateEx.ps1 file.
Run the following command: Import-Module .\New-SelfSignedCertificateEx.ps1
Run the following command:
For iPhone :
New-SelfSignedCertificateEx –Subject “CN=<you're pubic-IP>” –IsCA $true –Exportable –StoreLocation LocalMachine
For Android :
New-SelfSignedCertificateEx –Subject “CN=<you're pubic-IP>” –IsCA $true –Exportable –StoreLocation LocalMachine -SubjectAlternativeName public-IP, IPv4-Address
Important Notes:
- <you're Public -IP> = Enter you're Public IP or Server Address. Make sure Public IP or Server Address is working outside the domain. Before proceeding, check whether Web client is working on Public IP or Server Address)
- Here you can find out you're Public IP
- https://portchecker.co/
- <IPv4-Address> = Go to Run [Press win + R] and Type 'cmd' then Open cmd windows page. inside Type 'ipconfig' and press 'Enter' Keyboard key. There is shown IPv4 Address like xxx.xxx.xxx.xxx [IPv4 Address for your NAV 2016 S/W Installed]
Lets Start Create Self-Signed Certificate :
Important Notes:
Make sure Public IP or Server Address is working outside the domain. Before proceeding, check whether Web client is working on Public IP or Server Address).
http://114.25.29.46:8080/DynamcisNAV90/WebClient
Step 4:
Managing Certificate
Go to à Run Window [Press Win+R] à Type “mmc.exe” and Press OK.
After Open MMC à Go to File “Add/Remove Snap-in” à Select “Certificates” à Click on “Add” à Select “Computer Account” à Click on “Next” à Select “Local Computer” à Click on “Finish” à Click on OK
"Select Certificate and Copy”
- Select the certificate, right-click and export the certificate.
Follow by 'Next' Instruction ---> Then Choose Option 'No, do not export the Private Key'
- Then Choose Certificate format 'DER encoded binary X.509 (.CER)' --> select next and Choose the file Path to save the certificate and Choose 'Next' to Complete the Process.
Step 5:
Open --> 'Dynamics Nav 2016 Administration' --> Choose Instance Name and Paste the 'Certificate ThumbPrint' in a box [Refere Step3 there you can copy thumbprint in notepad] OR you can copy thumbprint from where you can export the certificate for this Open certificate choose Detail tab there is thumbprint option-click and copy the thumbprint. then Restart the Service.


Step 6:
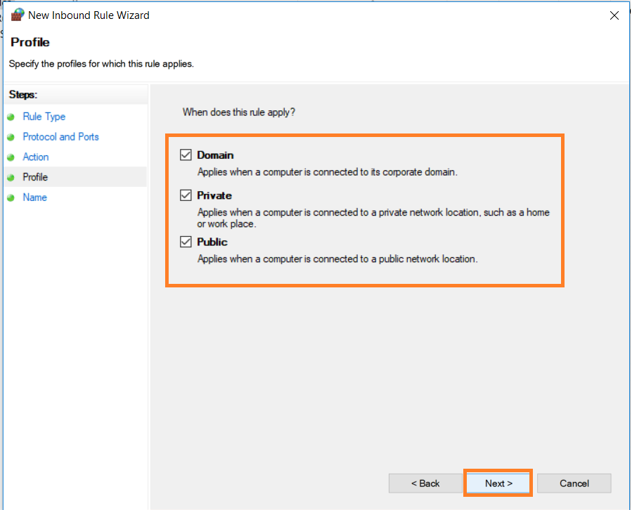
Configure the Web Server For Web, Tablet & Phone Client. Check the web client [IIS] Port is Open or Not in window firewall.if not then follow the below instruction.
1. Go to à Start à Type Windows Defender Firewall with Advanced Security
And Create Inbound Rule and Outbound Rule for Port [Mobile port] As below
I show only Inbounding Rule do the same for Outbounding Rule for Mobile Port
- Right click on Inbound Rule and select New Rule
- Select Port
- Select the Allow the Connection and Click next.
Important: Do the same for outbound Rule
Step 7:
Setup for Port Forwarding in Router [for Phone web client URL pass through Router that
can access through anywhere outside the domain
Type the IP address on the browser that you have [Internet Service Provider like Hathway, Hi-fi, Airtel etc.]
Login Your Account-->Select “Advanced” à click on “Virtual Server”
Select Service Name: “WEB”
Protocol: “TCP”
WAN Port: 883
LAN Open Port: 883
LAN IP Address: Server PC IP [IPV4] addresses that Navision Install [CmdàIpconfig]
Click Apply Changes.
Important Notes:
- Check above port is open or note refer the below link
If your define port is not open then define other port otherwise it will not be work.
Step 8:
Binding the Navision Web Server to IIS Manager for web, Tablet & Phone Client.
Open IIS Manager à Go to Microsoft Dynamics NAV 2016 Web Client à Bindings à Click on Add
Type = https
IP Address = All Unassigned
Port = 883 [you can define any Port but check that is not in used]
SSL Certificate = Select Certificate
Press OK
Stop and Start the Web Site.
Step 9:
Install Certificate on the Phone
- Copy or mail the certificate that you exported.
- Run the certificate file and install the certificate on your Mobile.
for iphone or ipad:
After installing the certificate
Go the general àaboutàCertificate Trust Settings and enable full trust for the root certificate as shown below:
- for Android:
No need Any setting. Only Install certificate and Login the app
Open Microsoft Navision App and Type the URL and Login the username and Password
eg. https:// 114.25.29.46:883/DynamicsNAV90


Thanks for posting this article. It really helped me a lot to clear my doubts.
ReplyDeletetechnology write for us